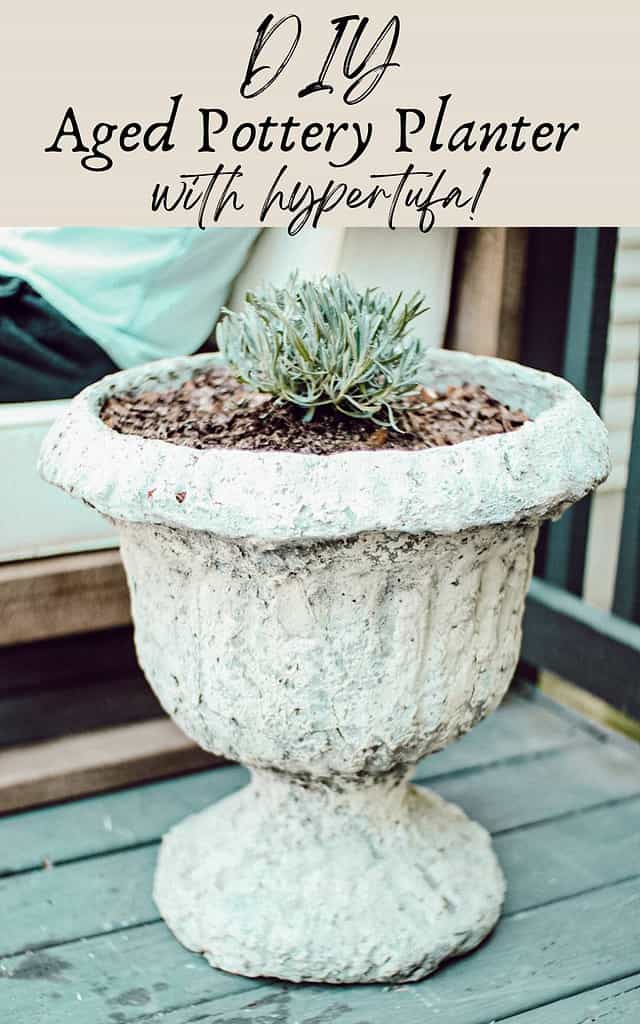
DIY Faux Aged Stone Planter (From Plastic Pot)
This post will break down how to transform a simple and cheap plastic planter into a faux-aged stone planter urn that will instantly upgrade your outdoor living space! This simple aged pottery planter DIY is inexpensive, and with a little effort looks exactly like the real thing!
Some of the links below are affiliate links, meaning that at no extra cost to you, I will receive a small commission if you click through and make a purchase.
Easy DIY Project To Create Aged Pots
Unique aged stone and aged terracotta pots are trending HARD right now. Partly inspired by the new Amber Interiors Lines and Studio Mcgee, everyone is loving the earthy, architectural trend of blending a natural material like stone into interior and exterior design.
This is the first home we’ve owned that I can actually design an outdoor living space and BOY do I have plans. (If you follow me over on IG, I’m tracking our process of renovating our backyard with Yardzen!) One of the first things I wanted for the outdoors was some gorgeous, European-inspired planters.
This post was inspired by a gorgeous cast iron planter urn I saw at my favorite antique thrift store. There were two of them and they were stunning.

I immediately envisioned a planter urn on our back deck filled with lavender, ornamental grass, and baby breath. I crossed my fingers and glanced at the price tag and was filled with disappointment that it was $350! YEP. For two urns for my deck, we’d be pushing $1000.00. Yikes.
My next thought process was how I could possibly transform a cheap plastic planter urn or pot into something with an aged look. I’ve always loved the vibe of aged terracotta pots, especially for my outdoor space.
Inspiration For This Project
For our deck space, I envision an eclectic collection of rustic, aged stone, and aged terracotta pottery.
Although they aren’t vintage, a few stores like Pottery Barn and Terrain carry stone urns that have an “aged pottery” look. Unfortunately, they are still quite a hefty price tag! The beautiful pot below is from Terrain and runs around $300-$500, depending on the size.

I began my research on creating an “aged stone” or “aged pottery” planter and I stumbled on the world of “hypertufa”.
If you had never heard of hypertufa before, you aren’t alone. If you currently own any semi-light weight stone look pots, odds are they MIGHT be hypertufa. I went down a deep, deep hole of all the things you can make from hypertufa and YALL. It’s such a great way to get the look you want for cheap!
What Is Hypertufa?
Hypertufa is a lightweight mixture of Portland cement, peat moss, and perlite that is used to create porous objects that resemble tufa rock. Tufa rock is a natural, porous rock that is found in areas with calcium-rich water. Hypertufa is a great alternative to natural tufa rock, which is expensive and hard to find.
Hypertufa is easy to work with, can be molded into any shape, and is perfect for creating planters that can be easily moved around your garden.
A simple Google search will show you how many incredible things you can make from hypertufa! Flower pots, bowls, bird baths, urns, and vessels of all shapes and sizes!
There are multiple methods to creating an aged pottery planter diy with hypertufa. The common way hypertufa is used is to create pottery in a mold. Check out Jenna Sue Designs’ custom hypertufa pot she made for her INTERIOR tree! This post was so inspiring.
Because I really wanted a vintage-style European urn for my deck, creating a mold for that shape would have been expensive and difficult. For this reason, I decided to use an existing (inexpensive) planter and use the hypertufa material to coat the entire pot to create the aged look.
What You’ll Need To Create an Aged Pottery Planter
This is honestly one of my favorite DIY projects in awhile! The coolest part of this hypertufa method for creating aged pottery? It’s only 5 main ingredients! The total cost of this project was:
$25!
Pretty reasonable considering that the one I wanted was over $300!
- Plastic urn shaped planter– $15.99 (This is the one I used! Home Depot carries similar!)
- Portland cement
- Peat moss
- Perlite or vermiculite (in the garden center!)
- Water
- Large container for mixing (I used a 5 gallon bucket from Lowes)
- Measuring cup
- write brush
- white or off white acrylic paint
- paint brush
- Dust mask
- Rubber gloves
- Sandpaper
Step-by-Step Guide for Aged Pottery Planter DIY
Let’s get started with this aged pottery planter DIY! In just a few simple steps you can transform a cheap plastic planter into a stunning aged planter.

Step 1. Prep Your Planter Pot and DIY Area
The first step of this simple DIY is to gather all the materials. I set my materials up on my back deck. You could do this project in the garage but I wanted access to direct sunlight to speed up the curing process PLUS I wanted better ventilation for myself.
I recommend doing this whole project on a tarp or drop cloth. It can get messy and you don’t want dry concrete clumps all over your garage or driveway! I wiped down my planter with a damp cloth to help the hypertufa adhere better.

Step 2. Mix The Hypertufa Ingredients
The hypertufa mixture is very straight forward and I honestly eye-balled the amounts. To make hypertufa, mix equal parts of Portland cement, peat moss, and perlite in a large container. Mix the ingredients together until they are thoroughly combined.
NOTE: You will want to wear a mask and gloves for this part. The Portland cement gets EVERYWHERE.
Once the ingredients are combined, add water until the mixture reaches the consistency of oatmeal. I added water very slowly and mixed thoroughly before adding more. You don’t want the mixture to be too runny. I noticed the mixture thickened up as it sat in the sun so I brought a watering can of water to my workspace so I could add more water as needed.

Note: My helper was sent inside once I realized how much the concrete hangs in the air!
Step 3: Apply Hypertufa Mixture To Your Pot
Ok, this part was a process! There are a lot of different methods to do this and it really comes down to personal preference.
In retrospect, there are a few things I could have done to make this go faster. I’ll tell ya’ll exactly how I did this AND how I think it would have worked better. This was a ton of trial and error and hopefully, I can help yall to get it on the first try. Ultimately, I am SUPER happy with my finished product so I’m ok with the time it took.

I decided to start with the pot upside down as pictured. It was easier to see all the nooks and crannies from this angle. Because my pot was cheap plastic, I wanted the rim of the pot to look substantial and heavy so I decided to fill under the lip of the pot with the mixture. This worked well and allowed the rest of the hypertufa to stick better.

After filling the lip of the pot, I worked my way up and out. Looking back, I could have benefited from putting a thicker layer of the hypertufa on the sides of the pot. Late in the process, I’ll show how it’s necessary to sand down the sides and due to this, I had more cracking than I wanted because my layer was too thin.

I would scoop up a few handfuls and press the material onto the pot working up and out. If the material is not sticking well, it’s probably too dry. If it sticks and then runs off, it’s too wet. As I worked, I figured out a pretty good consistency that seemed to work well.
Don’t Forget Your RUBBER Gloves!
Another major tip for this stage in the game is: PLEASE. Wear rubber gloves. Not sure what I was thinking with fabric gloves. They got totally soaked and my hands had such bad irritation for DAYS. Maybe that’s obvious but just saying!

Adding Ridges/Texture To Your Pot:
Once you apply the material to the sides of the pot, it’s hard to see where the ridges of the plastic pot are at. I wanted the pot to have ridges like the plastic pot did, so after I applied one entire layer to the sides of the pot, I went back and pressed my finger into the material in a line down the pot. I did this around the whole circumference of the pot to create “ridges”. You don’t need these ridges to be super deep. It worked best to do this after the material had dried on the pot for a few minutes.
At this point, I had covered everything but the base of the pot and the top rim which I planned to do once I flipped the pot over. Let the pot dry for about 6 hours in the sun.

Step 4. Dry Brushing Your Pot to The Desired Look
The next step is to use a wire brush to rough up the outside of your pot. This step is essential to create an aged finish. You may want to wear your mask for this part because it gets dusty. After you scrub at the hypertufa for a while, it looks less “concrete” and you can see the dimension that the peat moss and perlite add.

There are several easy techniques to get the aged finish you are after. I worked in small sections, going around the pot with a small wire brush. Another method is to use a wire brush attachment for your drill. If you are doing a huge pot or multiple pots I’d recommend that because it will be much faster.
You don’t want the concrete to be completely cured when you do this step or it will be very difficult to get the distressed look. I recommend letting the pot dry overnight and doing this step immediately the next morning. In my case, I applied the concrete early morning so I did this step in the evening around 7pm.
Step 5. Apply a Coat of Hypertufa to Any Areas That Aren’t Totally Coated
At this point, I flipped my pot over and did the same process for the areas that were not covered yet. On this urn, that was the outer lip of the pot, and the neck/base of the pot. I made sure to coat the inside of the pot a few inches down so you wouldn’t see any of the plastic.

I also added ridges to the base and lip of the pot the same way I did with the sides. This was the end result at this point in the process. I was FLOORED! It looked great. I covered it with a tarp and let it dry overnight.
Troubleshooting:
The next day is where I ran into a few issues. I uncovered my pot in the AM to do the wire brushing on the base and lip. Unfortunately, the layer I did on the base was too thin and several areas cracked and crumbled when I tried to brush it. (see picture below)

I also noticed some cracks on the sides of the pot and worried that pieces of the side might just fall out. I decided to mix up another batch of hypertufa and re-coat the entire base on the outside of the pot with the pot sitting upside down again.
This time, I decided to fill the entire base so that the concrete had more to grip. I wish I had done that originally because it worked SO much better! Here’s how it looked when I was done.

I had to let this base dry overnight AGAIN. If I had done it this way originally, it would have gone a lot faster BUT ya live and learn.
The next morning, I had some more issues with cracks and crumbling on the sides of the pot. As I stated earlier in the post, I think this would have been less of a problem had I done a thicker coat, to begin with. It’s hard to add extra coats because the hypertufa just doesn’t adhere as well.
Techniques To Fix Cracks In Your Pot
One technique I’ve seen is using a joint compound or stucco patch to patch any cracks you have. I didn’t have either on hand and REALLY didn’t want to prolong this project any longer so I mixed up one final batch of herpertufa. I made this batch a little on the runnier side and used it to patch any areas that were thin or cracking.
This worked ok. I can still see the cracks but they seem more secure now. I also don’t mind the cracks as they go quite well with the aged pottery look. If you want zero cracks, try using the joint compound.
After my final coat of hypertufa, my pot looked like this:

You can see the areas I patched and the base is still wet. The color lightens a lot over 3-5 days. I let it dry another 6 hours before doing my final run of wire-brushing.
NOTE: Most cracks in hypertufa are caused by the hypertufa drying too rapidly. When making hypertufa pots in a mold, it’s recommended to cover the pot while it dries and periodically spray it with water from a spray bottle. Because it was such a thin layer on this planter and it dried directly in the sun, some cracking occurred. It’s ok though because it just adds some more character.
Step 6. White-Wash Your Pot With White Paint (optional)
This step is totally optional. I am a proud member of the no-gray brigade (idk, just made that up) so anything that is gray feels too cold and modern for my beige-loving self. I wanted this planter to look more limestone and less “slate”.

In all honesty, after the stone had cured a few days it was really a great neutral stone color but I wanted just a touch more of white. I used this acrylic craft paint that I had in my house already. This helped to add a little texture and more of a “limestone” look.
I didn’t want any brush strokes to show up so I decided to water the paint down significantly. To do this, simply take a bit of white paint and add a little water. I used a chalk paint I had lying around but really any sort of acrylic paint or even spray paint would probably work! I poured in a bit of water and stirred until the paint was super runny.
Brush the paint on with a small paintbrush or foam brush, working your way around the pot in small sections. Don’t overdo it with this step. You want it to look natural! If you accidentally do too much paint, grab your wire brush and rough it up again!
Step 7. Plant in Your New Flower Pot/Planter!
That’s about it! This project took me several days because I had to let it dry and come back multiple times. If you follow my recommendations in this post, you should be able to create this DIY in 2 days or less.

I want these pots to be filled with lavender which will eventually be towering and blooming. My little baby lavender is enjoying its new home! Would you ever know this was a cheap plastic pot?!

Here is an up-close shot of the pot texture. You can see the cracks but it looks like part of the “aged stone” look.
The best part about hypertufa is the aging process will continue over time and it gets even more “vintage” looking as time goes by!
I already love it and it will just keep getting better! What do you think of this aged pottery planter DIY? Let me know below!

FAQ about Hypertufa Aged Pottery Planter DIY:
Q: What is hypertufa?
A: Hypertufa is a lightweight, porous, and durable material made from a mixture of Portland cement, peat moss, and perlite or vermiculite.
Q: Why should I make a hypertufa planter?
A: Hypertufa planters are a great DIY project for any gardener who wants a unique, rustic-looking planter that is both durable and lightweight. They are also customizable and can be made in a variety of shapes and sizes.
Q: What materials do I need to make a hypertufa planter?
A: You will need Portland cement, peat moss, perlite or vermiculite, water, a mixing container, and a mold to shape your planter.
Q: How can I decorate my hypertufa planter?
A: Hypertufa planters can be decorated using a variety of techniques, such as painting, staining, or adding decorative rocks or shells to the surface.
If you try your hand at this aged pottery planter diy, please let me know below!


What a creative project and great idea to DIY! I would’ve never thought of it. I do love the vintage and aged look though! Very thorough info!
I am in awe at how you did this! Incredibly creative. Thank you for the inspiration!
Wow this is amazing! I love how this turned out and for the easy step-by-step instructions.
This is so cool! It turned out beautiful!
You are so crafty and boy did you save money on this project. Loved your post!
That turned out amazing! Thanks for sharing this DIY. I love the cracked, rustic look. I’ll need to give this a try.