Easy DIY Hack For How to Paint a Harlequin Pattern
There is something so classically European about a harlequin design and I knew I wanted to try it on our deck floor which REALLY needed some love. In this post, I’ll break down the process I used to create a DIY harlequin deck floor – with zero guesswork and minimal measuring. I’m SO in love with our deck transformation and hope you love it too.

Some of the links below are affiliate links, meaning that at no extra cost to you, I will receive a small commission if you click through and make a purchase.
Our Deck Transformation:
Our deck was terribly chippy, worn, and overall an eyesore in our new patio space in the backyard. I really wanted to elevate the deck and make it a focal point of the yard instead of something I hated.
Here is a before and after of our deck to give you an idea of how much this project transformed our yard:


I’m over the moon with how great my deck looks now! This project was so fun to complete and now I have the European-inspired harlequin deck of my dreams!

What is a Harlequin Pattern?
Also called a checkerboard pattern, a harlequin pattern refers to a distinct geometric pattern characterized by a repetitive arrangement of diamond shapes.

In a harlequin pattern, the diamonds are usually arranged in alternating colors or shades, creating a visually striking and symmetrical effect. The harlequin pattern’s repetitive and dynamic nature can create a sense of movement and energy, making it a popular choice for creating a visually engaging design.
In recent years, more and more designers are incorporating harlequin design patterns into flooring and floor coverings! For example, Chris Loves Julia recently released some gorgeous rugs with their Loloi collection that have a harlequin print! (See below!)
The Truth About Painting a Harlequin Pattern:

Can I be honest with you? My brain is NOT mathematical in any way. Telling me to measure out angles and calculate the widths of things just stresses me out and I can feel my brain shutting down.
I thought painting a DIY harlequin deck floor would be SO easy, but once I got started I found myself super confused. All the blogs I went to for inspiration didn’t give me a ton of details about how to accurately measure your squares out!
GOOD NEWS: The process I’m about to break down may sound complicated but it’s actually the EASIEST way to get a perfectly measured harlequin pattern every time.
Our Deck: Before
If you’ve been following along with our backyard renovation on Instagram or on the blog, we have made some big changes to our sloped backyard this summer!
We started by getting CAD designs drawn up by Yardzen, installing an antique brick paver patio, adding a bunch of antique-look planters, shrubs, trees and other plants, installing a new swingset for our kids, and mulching out the entire natural area! It’s been a journey but now we are SO freaking excited about our yard!
P.S. If you want to get $100 off of CAD designs from Yardzen, Click Below!


After our patio was finished, I couldn’t help but notice how my eye was drawn to the chippy, peeling mess that was our current deck! The Yardzen plans we created have a beautiful, extended wood finish deck that we plan to install in a few years, but for now I KNEW we had to do something about this deck surface in the meantime.
Harlequin Floor Inspiration
Since we know that our deck will need to be totally replaced within the next 2-3 years, I decided I wanted to experiment and try something fun/unique for the interim period. A DIY harlequin deck floor seemed like the perfect solution!
I’ve always thought a harlequin pattern floor is stunning but I’ll be honest that the classic black and white harlequin is a bit much for me personally! The contrast between white squares vs. black squares is sometimes overpowering (just my opinion).
I started looking online for inspiration and stumbled on several DIY’ers who painted NEUTRAL harlequin floors!
This is a great hack for scratched/ really beat-up hardwoods that you don’t have funds to refinish/replace. It’s also the perfect hack for an old deck like mine that needs a fresh coat of paint and a little pizazz!
Deck Paint Vs. Deck Stain
I had never painted a deck before and wasn’t sure what type of paint is durable, affordable, and would allow me to customize my color.
I started doing some research on this and found that if you paint a deck with regular exterior paint it will very quickly peel up and be ruined. The best option is to use a waterproof deck stain. The best thing about the deck stain I used is that it can be color matched to any shade!
I used Flood Solid Exterior Deck Stain. I can’t link it because it has to be customized for shade.


For this project, I used:
- Accessible beige at 50% (Base/lighter color)
- Shiitake (darker color)
Both are Sherwin Williams colors that I had color matched at my local paint store!
This deck stain is awesome! It dries very quickly and leaves a nice matte finish. It also does not require any primer or top coat BUT be aware that if you are painting over a dark color (like I was), it may take several coats to get good coverage.
Materials For This Project:

This DIY Harlequin deck floor project was actually pretty affordable in comparison with having the deck painted by someone else or having it replaced.
Here is what you need:
- 3 gallons of Flood solid deck stain in Accessible beige by SW at 50% saturation
- 1 gallon of Flood solid deck stain in Shittake by SW
- Wide and thin paintbrushes
- Small roller (I believe it was 6 inches).
- 12 inch large roller + roller extension handle
- cardboard or sample tile for outlining squares
- frog tape (Not to be confused with regular painter’s tape!)
- chalk line (Essential for this process)
- laser level (optional)
- Tape measure
- construction pencil for markings
Painting a Harlequin Pattern on a Deck: Step By Step
Let’s get started!
Step 1: The Prep Work
The first thing you need to do when painting a deck is the prep work. This part takes little time, but will greatly benefit you in the long run.

I started with a good power washing of the deck. This includes the posts going down into the ground, the underside of the deck spindles, and in-between the floorboard cracks.
We have THIS power washer and it is a lifesaver! This only took us about 20 minutes to do, even with our “helpers” in tow!
I read several recommendations that after power washing, you should let your deck dry for 2 days. It was roughly 105 degrees the day I started this project and I only let it dry for one day.
You will need to keep a broom handy to keep the surface squeaky clean during the painting process.
Step 2: Start with Your Base Color
If your deck is already the base color you want, you can skip to Step 3.
For my base color, I chose the lighter shade (accessible beige). I made the decision to start with the deck railings because I knew that would likely be the most time-consuming.
I was right.
For the first coat, I used a brush. On the second coat, I used a roller and tried to get a pretty thick coat on. For my third coat, I used a brush and really made sure to get in every crack/crevice.
What started as paint therapy turned into me hating my life as every spindle seemed to take 1,000 years. LOL. It was very tedious but when I finally finished the third coat, the coverage looked good and I was pumped. I did this project mostly during naps, so it took me about 4 days to do just the railings.

After the railings were painted, I used a roller intended for rough wood floors and an extension handle to paint the floor. This was so much easier. Here is what I did:
- Roll entire deck twice.
- Use a paint brush to get in between slats and in cracks/knots for 2 coats.
- Roll entire deck one last time.

Done!
I sat back and admired my hard work for a while. Painting the solid color on the deck was definitely the most time-consuming piece. It already looked 100x better IMO, just from that one step.
Step 3: Measuring for the Harlequin Pattern
Now to the Fun and slightly complicated part- Painting your harlequin pattern!
A few things to decide before starting to paint a DIY harlequin deck floor:
First, determine the size you want your diamonds to be. I wanted my pattern to be noticeable but not overly busy. I ultimately chose a 20×20 square for the size of my diamond.
Second, use cardboard or brown paper to cut out a few diamonds and line them up how you want them in your space. This is important to do in order to visualize and make sure they are the right size.
Third, decide where you want to start your pattern. I highly recommend starting in the dead center of the room. The first diamond you “map out” is the most important.
After you’ve figured out these details you are ready to begin!
- Start by measuring and marking your center diamond. Place the diamond in the dead center of the room/floor and work your way out from the center diamond. We did this with a brown paper square cut out to 20×20 to help us visualize.

NOTE: You don’t have to have a cut out of the diamond, it just helps for visualization. You could always just measure out and mark the corners of a 20×20 square with a pencil.
- After marking each corner of the diamond, use a chalk line to run a line across each side of the square and all the way to the edges of the deck surface. When done with this step you should have a center diamond with 4 chalk lines going out from the center diamond, all the way to the edge of the deck.


Note: You can choose to tape the chalk lines as you go OR make all your chalk lines and then go back over and tape. For me, it helped to tape out and visualize my center square right away. Now that I feel more experienced, I think I would do ALL my chalk lines first and then tape.
Critical Step:
Once you have your chalk lines mapped out, you will tape on the OUTSIDE border of the diamond (on all sides). It’s very important that your first diamond is taped on the OUTSIDE border.
Now that you have your first diamond outlined, you will begin adding more rows all the way across the deck. The easiest way we found to do this was to use a tape measure and work our way down the existing 4 lines of tape, marking every 20 inches.

After marking, pop a chalk line perpendicular to the existing tape lines to create another row of squares/diamonds.
IMPORTANT STEP: HERE is where it can get confusing. After you have taped your center square on the outside of the chalk lines, in the next row, you are going to tape on the INSIDE of the chalk lines (meaning the tape is on the inside border of the square, not the outer border). After that row is finished, you will tape on the OUTSIDE of the border again and continue going every-other.
This is going to create large squares and skinny squares. Each large square will be surrounded by skinny squares. This sounds confusing but following the “outside-inside” taping process will do this for you automatically.
When we were finally done with all the lines and taping, it looked like this:

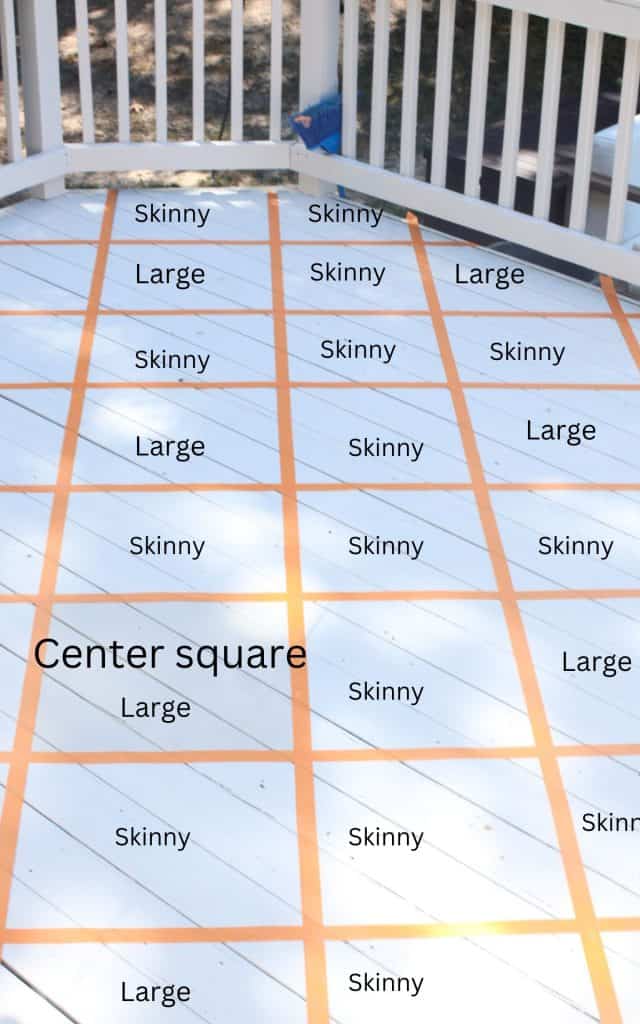
NOTE: If you are worried that your squares will be different sizes here, don’t be! Later on, we will move the tape and it will all make sense 🙂
Step 4: Ensure Tape is Forming a Seal
Once your chalk lines have all been taped over, ensure a good seal of the tape before painting your secondary color (Otherwise your secondary color will seep under the tape and you won’t have crisp lines!)
I used a small wallpaper seam roller and rolled over all the tape pieces, making sure there were no air bubbles to be found. You could stop there and go on to the painting portion but I did one extra step to make sure my seams were nice and crisp with no bleeding under the tape.

TRICK:
Using a small roller and your BASE COLOR, roll OVER the tape of the squares you are going to paint. Rolling a quick/light coat of paint along the tape seams creates a seal so that your darker shade won’t leak under the tape! It makes sense because the shade that actually leaked under the tape is the shade that is already supposed to be there- your base color! In the image above, you can see where I painted over the tape of the squares with my BASE color.
Step 5: Paint Diamonds With Secondary Color
Finally, after all that measuring and taping, it’s time for the secondary color!
Once everything is taped, it can be confusing to remember which squares you painted and which SHOULD be painted. I marked the squares I was painting with a piece of tape to help.
For this first round, you are painting only the LARGE squares! Here is how I marked my squares.
Mark every LARGE diamond, working out from the center diamond.

Next, I began to paint the entirety of the square with my secondary color. For the first coat, I went fairly light to help prevent the paint from bleeding under.
After one coat, I let the squares dry and then went over each square with a thin paintbrush, making sure I got between the slats of the deck boards and got paint in all the little cracks/crevices. Then it was on to my second coat. After the second coat, I did the same process with a paintbrush and then finished off with a third coat of my secondary color.

Next, let the squares dry almost completely. Contrary to common belief, it’s actually better to remove tape when the paint is still SLIGHTLY tacky. After I removed all the tape, here is how it looked:

Step 6: Retape Your Lines On The INSIDE of the Large Diamonds
Yes, after all that taping, you are going to remove the tape and then re-tape once again. But don’t freak out! The second time taping everything went super fast because my chalk lines were still visible PLUS the already painted diamonds helped outline the rows. No measuring is needed.
Ok, so think of the first round of tape as being on the OUTSIDE of all your painted squares. After you remove your tape, you will be placing your tape on the INSIDE of your LARGE squares. You will still have large squares and small squares but in reverse from the first time.
At this point, you should have re-taped all your lines on the INSIDE of the painted squares and should be able to see your new “large” squares. This is a good time to go ahead and mark the squares you want to paint with tape. At this point, it will be pretty obvious which diamonds need to be painted to finish the pattern.
Repeat the painting process x3 coats and let the paint mostly dry before removing the tape!

Step 7: Remove Tape and Touch Up Lines
When the second round of tape came off the deck, I think my jaw dropped. It worked! My lines were almost PERFECT. Every diamond touched each other right at the tip and very little paint had seeped under the tape.
The final step is to use a small paint brush and touch up any areas the paint leaked or your line doesn’t look straight. This took me only a few minutes because honestly, it was almost perfect.
Step 8: Enjoy Your DIY Harlequin Deck Floor!
Ya’ll. I’m honestly ecstatic at how this turned out. It meshes perfectly with our herringbone antique brick patio and plays right into the European Farmhouse vibe I want in our backyard.

This DIY harlequin deck floor was such a great solution to avoid having to replace the entire deck this year. For only $300 I was able to totally transform our backyard and create an awesome focal point for outdoor entertaining!


Our kids love it too and have suggested we play a giant game of checkers on it! LOL. I’m not sure about that one but I’m excited to style this space with European-inspired pieces to keep the fun trend going.


Here are a few more before and afters of our DIY harlequin deck floor!


Follow Along With Our Outdoor Renovations!
If you love outdoor living and are searching for some new ideas, be sure to check out more of our outdoor projects below!


FAQ:
What is a Harlequin pattern?
A Harlequin pattern refers to a geometric design characterized by a repeated diamond-shaped motif. This pattern is often seen in art, fashion, and interior design. In fashion, Harlequin patterns are commonly associated with costumes worn by Harlequin characters in traditional Italian commedia dell’arte theater. The pattern consists of rhombus or diamond shapes arranged in a tessellated manner, usually with alternating colors. Harlequin patterns can vary in size, color, and complexity, and they have been used in various art forms, including textiles, ceramics, and painting.
How do you paint a Harlequin pattern?
There are a few ways to obtain the classic harlequin pattern. Some choose to individually tape out each diamond shape. This requires carefully cutting out the tips of each diamond to make sure the tape isn’t covering the corners that need paint. This requires very precise cuts and can be time-consuming and difficult.
The second method is the “outside, inside” method described above. This is achieved by starting your pattern taping on the outside of a diamond. In the next row, you will tape on the inside of the diamond and so on. After the first round is complete, the diamonds are painted and then the whole floor is retaped in reverse- starting on the inside of your center diamond.
Both methods have some drawbacks and advantages but the “outside, inside” method is the most precise.
I hope this DIY harlequin deck floor is inspiring to you. If you have any questions, shoot me a comment below. I’m happy to help or clear up any confusion you may have!


I love this pattern and your painting tips! Definitely would look gorgeous an old wood floor in a room or porch… Thanks for your help!
Thanks so much!
This was so helpful and inspiring! I love how it turned out, and this pattern would be a fabulous addition to our porch someday!
Thank you! Let me know if you end up doing it!
This is so unique! I would have never thought to paint a design on a deck. I love it!
Thank you so much! it was lots of fun!